If you’re a cycling enthusiast or just starting out, understanding the right bike inner tube size for your ride is essential. Whether you need to replace a worn-out tube or want to upgrade for better performance, this guide will help you choose the perfect size to keep you rolling smoothly. From road bikes to mountain bikes and everything in between, let’s take a closer look at the key factors to consider when selecting the right inner tube size for your bike. So, grab your helmet, hop on your saddle, and let’s get ready to hit the road with confidence!
Determining the Right Inner Tube Size
When it comes to bike inner tubes, determining the right size is crucial for optimal performance and safety. Using an incorrect size can lead to uncomfortable rides, increased risk of punctures, and even potential damage to your bike. To ensure you have the right inner tube size, there are a few key factors to consider: the standard inner tube sizes, measuring the wheel diameter, determining the tire width, and taking the tyre aspect ratio into account.
Standard Inner Tube Sizes
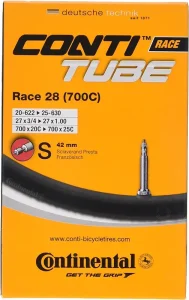
Before diving into the specifics of measuring and determining the right inner tube size, it’s helpful to understand the standard sizes available. Bike inner tubes come in various sizes, each designed to fit a specific type of bike. The most common sizes are:
- 26-inch
- 27.5-inch
- 29-inch
- 700c
These sizes correspond to different types of bikes, with 26-inch tubes commonly used for mountain bikes, 27.5-inch and 29-inch tubes for mountain bikes with larger wheels, and 700c tubes for road bikes. Remember that these sizes are general guidelines, and it’s essential to measure your wheel and tire to ensure a precise fit.
Measuring the Wheel Diameter
To determine your bike’s wheel diameter, you need to measure the distance from one edge of the wheel’s rim to the other. This measurement is typically expressed in inches and corresponds to the size of the inner tube you need. If your bike’s wheels have a 26-inch diameter, then you’ll require a 26-inch inner tube. Similarly, if your wheels measure 27.5 inches or 29 inches, you’ll need the corresponding inner tube size.
Remember to measure the wheel itself, not including the tyre. The diameter of the tyremight be different from the wheel diameter due to varying tire widths and aspects ratios.
Determining the Tyre Width
In addition to considering the wheel diameter, you also need to take the tyre width into account when choosing the right inner tube size. The tyre width is typically printed on the sidewall of the tyre and is expressed in millimeters. For example, you might see a tire labeled as 23mm, 32mm, or 40mm. This measurement indicates the width of the tyre at its widest point.
To ensure a proper fit, you’ll need an inner tube that matches the tyre width. Using an inner tube that is too narrow or too wide for the tyre can result in poor performance, increased risk of punctures, and potential damage to the tube.
Taking the Tire Aspect Ratio into Account
In addition to the wheel diameter and tyre width, it’s essential to consider the tyre aspect ratio. The aspect ratio is the ratio between the tyres height and width and is usually expressed as a percentage. For example, a tyre with an aspect ratio of 70 has a height that is 70% of its width.
The aspect ratio can affect the overall size and shape of the tyre, which in turn can impact the fit of the inner tube. It’s important to choose an inner tube that is compatible with the tyre’s aspect ratio to ensure a proper fit and optimal performance.
Types of Bike Inner Tubes
Now that you understand how to determine the right size for your bike’s inner tube let’s explore the different types of inner tubes available on the market. The type of inner tube you choose depends on the type of bike you own, as different types of bikes have specific requirements.
Road Bike Inner Tubes
Road bike inner tubes are designed for bikes built for high-speed riding on paved roads. They are typically lightweight and have a narrow profile to reduce rolling resistance. Road bike inner tubes often have a Presta valve, which is a long, slender valve that requires a specific pump nozzle.
Mountain Bike Inner Tubes
Mountain bike inner tubes are designed for off-road riding and can withstand the rough and rocky terrain encountered on trails. They are typically wider and more durable than road bike inner tubes to resist punctures. Mountain bike inner tubes are available in both Presta and Schrader valve types, offering compatibility with various pumps.
Hybrid Bike Inner Tubes
Hybrid bike inner tubes are designed for bikes that combine elements from both road and mountain bikes. They are designed to handle a range of terrains, from paved roads to light off-road trails. Hybrid bike inner tubes are available in both Presta and Schrader valve types.
BMX Bike Inner Tubes
BMX bike inner tubes are specifically designed for BMX bikes, which are built for tricks, jumps, and stunts. These inner tubes are often wider and more durable than road or mountain bike inner tubes to withstand the demands of aggressive riding. BMX bike inner tubes typically have Schrader valves for easy inflation.
Factors to Consider When Choosing Inner Tube Sizes
While understanding the different types of inner tubes available is important, there are several other factors to consider when choosing the right size for your bike. These factors include the terrain and riding style, your weight and load, the tyre pressure requirements, and compatibility with valve types.
Terrain and Riding Style
The type of terrain you primarily ride on and your riding style play a significant role in determining the appropriate inner tube size. If you predominantly ride on tarmac roads, a narrower inner tube designed for road bikes may be the best choice. However, if you frequently venture off-road, a wider inner tube designed for mountain bikes may be more suitable to handle the rough and unpredictable terrain.
Weight and Load
Your weight, along with any additional weight you may be carrying, should also be taken into consideration when selecting an inner tube size. Heavier riders or those carrying extra gear may require a wider inner tube with a higher volume to support the additional weight. This ensures proper stability and reduces the risk of pinch flats.
Tyre Pressure Requirements
Every tyre has a recommended tyre pressure range, usually indicated on the sidewall of the tyre. It’s essential to choose an inner tube that is compatible with the tyre’s recommended pressure range. Using the wrong inner tube can lead to underinflation or overinflation, affecting the ride quality and increasing the risk of punctures.
Compatibility with Valve Types
Valve compatibility is another crucial factor to consider when choosing an inner tube size. There are three common valve types: Presta, Schrader, and Dunlop.
- Presta valves are commonly found on road bikes and some mountain bikes. They are long and slender and require a special pump nozzle for inflation. Ensure that the inner tube’s valve matches the valve hole on your bike’s rim.
- Schrader valves are the most common valve type and can be found on most mountain bikes, hybrid bikes, and BMX bikes. These valves are wider and resemble the valves often found on car tyres. They can be inflated using most common pumps.
- Dunlop valves, also known as Woods valves, are less common but can still be found on some older bikes. They have a similar appearance to Presta valves but require a different pump nozzle.
Make sure the inner tube’s valve is compatible with your bike’s valve hole to ensure a proper fit and easy inflation.

Common Inner Tube Sizing Mistakes to Avoid
Choosing the right inner tube size can be challenging, especially for beginners. To help you avoid common sizing mistakes, here are some pitfalls to watch out for:
Guessing the Size
One of the most common mistakes is guessing the size of your bike’s inner tube. Relying on assumptions or estimations can lead to ill-fitting inner tubes and compromises in performance and safety. Always take the time to measure your wheel diameter, tyre width, and consider the tyre aspect ratio to ensure an accurate fit.
Neglecting the Tyre Aspect Ratio
Many riders overlook the tyre aspect ratio when selecting an inner tube size. Failing to consider this factor can result in an inner tube that is too large or too small for your tyre, leading to potential issues with fit and performance. Ensure that the inner tube you choose is compatible with the tyre’s aspect ratio to achieve the best results.
Ignoring the Terrain and Riding Style
Misjudging the terrain and riding style can also lead to sizing mistakes. If you frequently ride off-road, using an inner tube designed for road bikes may leave you susceptible to frequent punctures and a poor riding experience. Conversely, using a mountain bike inner tube on predominantly smooth pavement may hinder your ride performance. Consider your terrain and riding style to choose the appropriate inner tube size.
Not Considering Weight and Load
Weight and load play a crucial role in determining the proper inner tube size. Neglecting these factors can result in underinflated or overinflated tyres, compromised stability, and increased risk of flat tyres. Take your weight, along with any additional load, into account when selecting an inner tube size to ensure a safe and enjoyable ride.
Proper Inner Tube Installation Steps
Once you’ve determined the correct inner tube size for your bike, it’s important to install it properly. Follow these steps to ensure a smooth and hassle-free installation:
Removing the Old Inner Tube
Start by removing the old inner tube from your bike. Begin by deflating the tyre completely using a valve tool or your finger. Once deflated, use a nylon pry lever or your hands to carefully pry the tyre bead away from the rim, working your way around the wheel. Once the bead is loose, you can remove the old inner tube from the tyre.
Inspecting the Wheel and Tyre
Before installing the new inner tube, take a moment to inspect your wheel and tyre. Look for any signs of damage or wear that could compromise the performance and safety of your ride. Ensure that the wheel rim is clean and free from debris, and check the tyre for any visible punctures or cuts. Address any issues before proceeding with the installation.
Inflating the New Inner Tube
To make the installation process easier, inflate the new inner tube slightly, just enough to give it some shape. Be cautious not to overinflate, as this can make the tube more difficult to insert into the tyre.
Mounting and Aligning the Tyre
Now it’s time to install the new inner tube into the tyre. Starting at the valve hole, insert the valve stem into the corresponding hole in the rim. Carefully work your way around the rim, pushing the tube into the tyre, ensuring it is properly seated without any twists or folds. Once the tube is fully inserted, begin mounting the tyre back onto the rim by pushing the bead into place, using your hands or tire levers if needed. Take care not to pinch the inner tube between the tyre and rim.
Once the tire is mounted, carefully inflate it to the recommended tire pressure. Double-check that the tire bead is properly seated on the rim, and inspect the entire circumference of the tire to ensure a proper fit. Make any necessary adjustments before taking your bike for a ride.
Understanding Valve Types for Inner Tubes
Valve types can vary for different inner tubes, and understanding the differences can aid in proper installation and inflation. Here are the three most common valve types:
Presta Valves
Presta valves, also known as French valves, are commonly found on road bikes and some mountain bikes. These valves are long and slender, with a threaded top that requires a specific pump nozzle for inflation. Presta valves offer advantages such as lighter weight, higher pressure capabilities, and ease of use with narrow rims. However, they require a pump with a Presta valve-compatible nozzle. It’s important to ensure that your pump is compatible with Presta valves before attempting to inflate a tube with this valve type.
Schrader Valves
Schrader valves are the most common valve type and can be found on most mountain bikes, hybrid bikes, and BMX bikes. These valves resemble the valves typically found on car tyres, making them easy to inflate using most standard air pumps. Schrader valves have a wider diameter than Presta valves, making them more robust and less prone to damage. They are also equipped with a spring-loaded valve pin for easy inflation and deflation.
Dunlop Valves
Dunlop valves, also known as Woods valves, are less commonly encountered but can still be found on some older bikes. They resemble Presta valves but have a different internal mechanism. Dunlop valves are less common nowadays but may still require a specific pump nozzle for proper inflation. If you’re unsure of the valve type on your bike, consult your bike’s manufacturer or a local bike shop for assistance.
Guidelines for Inner Tube Maintenance and Care
To keep your inner tubes in optimal condition, it’s important to follow a few maintenance and care guidelines. Regular inspections and proper inflation can help prolong the lifespan of your tubes and minimize the risk of punctures. Here are some essential guidelines to follow:
Checking for Leaks
Periodically inspect your inner tubes for leaks by visually examining them for any visible punctures or cuts. Additionally, you can inflate the tube slightly and listen for any hissing sounds that may indicate air escaping. If a leak is detected, use a patch kit (discussed later in this article) to repair the tube.
Proper Inflation and Deflation
Maintaining the correct tyre pressure is crucial for optimal performance and reducing the risk of punctures. Underinflated tires can increase rolling resistance, negatively impact handling, and increase the likelihood of pinch flats. Overinflated tyres can lead to decreased traction and a harsh ride. Refer to the recommended tire pressure range printed on the sidewall of your tyre and use a reliable pump with a pressure gauge to ensure proper inflation. It’s also essential to fully deflate the tyre before removing or installing the inner tube to prevent damage.
Protecting Inner Tubes from Damage
To prevent unnecessary damage to your inner tubes, take precautions to protect them while riding. Avoid riding over sharp objects, such as glass, nails, or thorns, whenever possible. When encountering rough terrain, adjust your riding style to minimize the impact on your tyres and tubes. If you frequently ride in areas prone to punctures, consider using puncture-resistant tires or tyre liners for added protection.
How to Patch a Bike Inner Tube
While proper care and maintenance can help prevent punctures, accidents can still happen. When faced with a punctured inner tube, patching it can be a cost-effective solution instead of replacing the entire tube. Here’s a step-by-step guide on how to patch a bike inner tube:
Gathering the Necessary Tools
To successfully patch an inner tube, you’ll need a few essential tools:
- Patch repair kit: These kits typically include patches, sandpaper or a metal scraper, and rubber cement.
- Rubbing alcohol or other degreaser: This will be used to clean the surface of the tube before applying the patch.
- Pump: Required for inflating the tube once the repair is complete.
Make sure you have all these tools readily available before starting the patching process.
Locating the Hole in the Tube
Begin by locating the puncture hole in the inner tube. Inflate the tube slightly to make it easier to spot any escaping air or bubbling. You can also listen for any hissing sounds. Once located, mark the hole with a pen or your finger to ensure you can find it again later.
Applying the Patch
After locating the puncture, it’s time to apply the patch. Start by cleaning the area around the hole using rubbing alcohol or a degreaser. Use the sandpaper or metal scraper included in the patch kit to roughen up the surface, ensuring better adhesion for the patch.
Apply a thin layer of rubber cement to the roughened area and spread it evenly with your finger or a small brush. Allow the cement to dry for a couple of minutes, or as indicated in the patch kit instructions.
Next, remove the backing from the patch and carefully place it over the hole, pressing down firmly for a few seconds to ensure a secure bond. Smooth out any air bubbles or wrinkles that may have formed.
Reinstalling the Patched Inner Tube
Once the patch is securely applied, it’s time to reinstall the patched inner tube. Start by deflating the tube completely and inserting it back into the tyre in the same manner as described in the “Proper Inner Tube Installation Steps” section above. Ensure that the patched area is aligned with the tyre so that it doesn’t rub against the rim, potentially causing additional damage.
After mounting the tyre and reseating the bead, inflate the tyre to the recommended tire pressure and double-check that everything is properly aligned. Take your bike for a short test ride to confirm that the patch is holding up well before embarking on longer rides.
When to Replace Bike Inner Tubes
While patching a punctured inner tube can be a temporary fix, there may come a time when replacement is necessary. Here are some signs that it’s time to replace your bike’s inner tube:
Visible Damage or Wear
If you notice significant damage or wear on your inner tube, such as large cuts, tears, or extensive patches, it’s best to replace it. Tubes with excessive damage are more likely to fail and can compromise your ride safety.
Frequent Punctures
If you find yourself constantly dealing with punctures, even after patching the tube multiple times, it may be an indication that the tube has reached the end of its lifespan. Frequent punctures can be caused by weakened rubber or worn-down patches, making replacement necessary for better reliability.
Loss of Air Pressure
If you frequently find that your tyre loses air pressure quickly, it’s possible that the inner tube has developed small leaks that are difficult to detect. Constantly inflating your tire is not only inconvenient but can also be a sign that it’s time for a new inner tube.
Age
Even if your inner tube appears to be in good condition, it’s important to consider its age. Over time, rubber can deteriorate and become less reliable. If your inner tube is several years old or you’re unsure of its age, it’s best to err on the side of caution and replace it with a new one.
Conclusion
In conclusion, choosing the right size inner tube for your bike is crucial for optimal performance and safety. By considering factors such as wheel diameter, tyre width, tyre aspect ratio, terrain, riding style, weight, load, tyre pressure requirements, and valve compatibility, you can ensure a precise fit and a smooth ride.
Proper installation, maintenance, and care of your bike’s inner tubes are equally important. Regularly inspecting for leaks, maintaining proper inflation, and protecting the inner tubes from damage can help prolong their lifespan and reduce the risk of punctures.
When faced with a punctured inner tube, patching can be a cost-effective solution, but there may come a time when replacement is necessary. Signs such as visible damage or wear, frequent punctures, loss of air pressure, or old age indicate that it’s time to replace your bike’s inner tube.
Remember, a well-fitted and properly maintained inner tube is essential for a safe and enjoyable ride, so take the time to choose the right size and provide the necessary care.