Clipless pedals are a game-changer for cyclists everywhere. If you’ve ever wondered how those experienced riders effortlessly power through their pedaling strokes, then clipless pedals might be the secret behind their fluid motions. But what are they exactly? Well, unlike traditional pedals, clipless pedals allow you to securely attach your cycling shoes to the pedals, giving you enhanced control and efficiency. By eliminating the need for straps, clipless pedals enable you to maximize your power transfer and maintain a steady connection with your bike. So, whether you’re a seasoned pro or just starting your cycling journey, understanding the ins and outs of clipless pedals is essential for taking your riding to the next level. Clipless pedals are a type of cycling pedal system that allows the rider’s feet to be securely attached to the pedals. Despite their name, clipless pedals actually utilize a cleat system to connect the cycling shoes to the pedals, providing a more efficient and controlled riding experience. This innovative pedal system has revolutionized the cycling industry and is commonly used by professional cyclists, recreational riders, and even commuters. In this comprehensive article, we will delve into the definition of clipless pedals, their mechanism of engagement, the benefits they offer, how to choose the right clipless pedals for your cycling needs, installation and set-up instructions, getting started tips, common concerns and maintenance advice, a comparison with platform pedals, and a look at notable clipless pedal brands. So, let’s jump right in and explore the world of clipless pedals!
Understanding Clipless Pedals
Definition of Clipless Pedals
Clipless pedals, despite their somewhat confusing name, are a type of pedal system used in cycling that allows cyclists to attach their feet to the pedals using a cleat system. Unlike traditional platform pedals, clipless pedals do not have toe clips or straps to secure the rider’s feet. Instead, they utilize a mechanism that engages with a specific type of cycling shoe equipped with a compatible cleat. This design provides a more efficient transfer of power from the cyclist’s legs to the pedals, as well as enhanced control and stability.
Evolution of Pedal Systems
To truly understand clipless pedals, it’s important to recognize the evolution of pedal systems. In the early days of cycling, riders used basic platform pedals, which were essentially flat surfaces that the rider’s feet rested on while pedaling. However, these pedals lacked any kind of mechanism to secure the feet, leading to potential slippage and reduced pedaling efficiency.
As cycling technology advanced, toe clips and straps were introduced as a means to address the issue of foot slippage. These cages were attached to the platform pedals and allowed riders to insert their feet, tightening the straps to secure them in place. While this provided a notable improvement in pedaling efficiency, it also introduced potential safety concerns, as riders could struggle to quickly release their feet in emergency situations.
The invention of clipless pedals revolutionized the cycling world by eliminating the need for toe clips and straps. Instead, the cleat system and mechanism on the pedal engage with compatible cycling shoes, providing a secure connection between the rider’s feet and the pedals. This new pedal design offered numerous benefits in terms of pedaling efficiency, control, stability, and safety.
How Clipless Pedals Work
Mechanism of Engagement
Clipless pedals work through a mechanism of engagement between the pedal and the cleat on the cycling shoe. The pedal itself is equipped with a spring-loaded mechanism that allows the rider to easily engage or disengage the cleat. When the rider places their foot on the pedal and applies downward pressure, the cleat securely engages with the pedal. This connection ensures that the foot remains in place throughout the pedal stroke, providing optimal power transfer and control.
To release the foot from the pedal, the rider simply twists their heel outward, causing the pedal to disengage from the cleat. This motion is quick and intuitive, allowing riders to release their feet with ease, especially in emergency situations. The engagement and disengagement mechanisms may vary slightly depending on the brand and model of the clipless pedals, but the general principle remains the same.
Types of Cleats
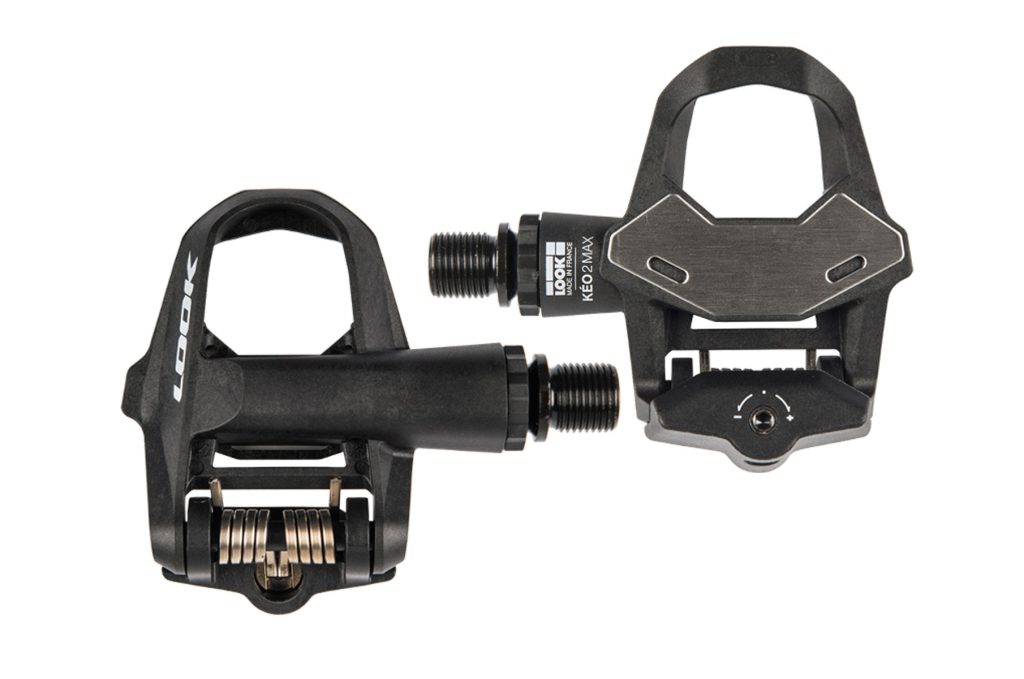
Clipless pedals require specific types of cleats that are compatible with the pedal’s engagement mechanism. There are several brands and models of clipless pedals available on the market, each with their own unique cleat design. The most popular brands include Shimano, Look, and Speedplay, which we will discuss in more detail later in this article.
The two main types of cleats used with clipless pedals are three-bolt cleats and two-bolt cleats. Three-bolt cleats, sometimes referred to as “road cleats,” feature three attachment points and are typically used for road cycling shoes. They provide a larger surface area of contact with the pedal, distributing the force more evenly and enhancing power transfer.
On the other hand, two-bolt cleats, also known as “mountain bike cleats,” have two attachment points and are primarily used with mountain biking shoes. These cleats offer a smaller contact area with the pedal but provide additional flexibility to the rider, allowing for easier walking or hiking off the bike.
Compatibility with Cycling Shoes
To fully utilize clipless pedals, it is essential to use cycling shoes that are compatible with the specific cleat system. Most cycling shoe manufacturers produce models that are compatible with both three-bolt and two-bolt cleats, providing versatility for riders depending on their cycling discipline.
When purchasing cycling shoes for clipless pedals, it’s important to ensure that the shoes have the appropriate drill holes or slots for attaching the cleats. Road cycling shoes typically have a three-hole drilling pattern, whereas mountain biking shoes usually have a two-hole drilling pattern. Some cyclists may opt for shoes that are compatible with both types of cleats, allowing them to easily switch between road and off-road cycling.
Ensuring compatibility between the clipless pedals and cycling shoes is crucial for achieving optimal engagement and maximizing the benefits of the pedal system. When in doubt, consult the manufacturer’s instructions or seek advice from a knowledgeable bike shop professional to ensure a proper match.
Benefits of Clipless Pedals
Improved Pedaling Efficiency
One of the key benefits of clipless pedals is the improved pedaling efficiency they offer. By attaching the rider’s feet to the pedals, clipless pedals allow for a more consistent and controlled pedaling motion. The secure connection between the feet and pedals ensures that power is transmitted efficiently throughout the entire pedal stroke, minimizing energy waste and maximizing speed.
With traditional platform pedals, riders can experience foot slippage, especially during high-intensity efforts or when wet conditions are present. This slippage results in a loss of power and decreases the efficiency of each pedal stroke. Clipless pedals eliminate this issue, providing a more stable and efficient platform for generating power.
Enhanced Control and Stability
Clipless pedals also provide enhanced control and stability while riding. With the feet securely attached to the pedals, riders can confidently maneuver the bike, particularly during technical sections or fast descents. The direct connection between the feet and pedals allows for instantaneous power transfer, enabling riders to respond quickly to changes in terrain or road conditions.
Furthermore, the stable connection between the feet and pedals helps to maintain proper body position on the bike. When riding with clipless pedals, riders can distribute their weight more evenly, utilizing both pushing and pulling motions to generate power. This balanced pedaling technique contributes to a smoother and more efficient ride, especially during long distances or challenging climbs.
Reduced Risk of Foot Slippage
A significant advantage of clipless pedals is the reduced risk of foot slippage. With traditional platform pedals, the rider’s feet can easily slide around, leading to potential accidents or decreased performance. However, with clipless pedals, the secure engagement between the cleats and pedals ensures that the feet remain in place, even under high-powered pedaling or rough riding conditions.
Reducing foot slippage is particularly beneficial for off-road mountain biking, where riders encounter uneven terrain, rocks, roots, and other obstacles. By eliminating the risk of feet bouncing off the pedals, clipless pedals provide increased confidence and control, allowing riders to push their limits and tackle challenging trails without worrying about their footing.
Increased Power Transfer
Clipless pedals excel in maximizing power transfer from the rider’s legs to the pedals. The rigid connection between the cleats and pedals allows for the most efficient transmission of power, ensuring that every ounce of energy expended by the cyclist is utilized in propelling the bike forward. This feature is especially advantageous for competitive riders or those seeking to improve their cycling performance.
When using clipless pedals, riders can engage not only the downward push of the pedal but also the upward pull. This full-circle pedaling motion engages more muscle groups, including the hamstrings and hip flexors, resulting in a more powerful and effective pedal stroke. By distributing the workload across multiple muscle groups, clipless pedals help to reduce fatigue and enhance endurance during long rides or races.
Choosing the Right Clipless Pedals
Consider Your Cycling Discipline
When selecting clipless pedals, it’s essential to consider your specific cycling discipline and riding style. Different types of clipless pedals are designed to cater to the unique demands of road cycling, mountain biking, gravel riding, or other cycling disciplines. Understanding the features and benefits of each pedal system will help you make an informed decision that aligns with your cycling goals and preferences.
For road cycling, three-bolt cleat systems are the most common choice. These pedals provide a larger contact area with the shoe, resulting in optimal power transfer and stability. Road-specific clipless pedals are often lightweight and designed to enhance aerodynamics, making them ideal for road racers or performance-oriented riders.
On the other hand, mountain biking typically utilizes two-bolt cleat systems. These pedals offer increased flexibility, allowing riders to easily walk or navigate technical sections without the need to remove the shoes from the pedals. Mountain bike clipless pedals are known for their durability, mud-shedding capabilities, and overall resilience to off-road conditions.
Gravel riding and cyclocross, which combine elements of both road cycling and off-road riding, can benefit from pedal systems that offer a balance between road and mountain bike clipless pedals. Some manufacturers produce specialized gravel pedals that accommodate both three-bolt and two-bolt cleats, providing versatility for riders who venture into various terrains.
Consider Your Cycling Shoes
In addition to considering your cycling discipline, it’s crucial to ensure compatibility between the clipless pedals and your cycling shoes. Different shoe brands and models may have specific drill hole patterns or slot designs that only accommodate certain types of cleats. Therefore, it’s important to check the specifications of both the pedals and shoes before making a purchase.
When selecting cycling shoes for clipless pedals, you should also consider factors such as fit, comfort, ventilation, and style. Cycling shoes come in various styles, including road-specific designs with stiff soles for maximum power transfer, mountain bike shoes with grippy outsoles for off-road traction, and casual commuter shoes that can be used both on and off the bike.
It is highly recommended to try on several pairs of cycling shoes to ensure a proper fit. Ill-fitting shoes can result in discomfort, hotspots, and even injury. Visiting a local bike shop and seeking professional advice can be immensely helpful in finding the right combination of clipless pedals and shoes for your cycling needs.
Pedal Float and Release Tension
When choosing clipless pedals, it’s important to consider pedal float and release tension. Pedal float refers to the degree of rotation or lateral movement allowed for the foot while engaged in the pedal. Float can vary between pedal models, with some offering minimal or fixed float, and others allowing for a greater range of movement. The ideal amount of float is subjective and may vary depending on personal preference and riding style.
Release tension, on the other hand, refers to the force required to disengage the cleat from the pedal. Some clipless pedals offer adjustable release tension, allowing riders to customize the amount of force required to release their feet. This feature can be particularly beneficial for beginners or those who prefer an easier release, as it provides an added sense of security and peace of mind.
It’s recommended to familiarize yourself with the float and release tension settings of your chosen clipless pedals. Experimenting with different settings can help you find the optimal configuration that suits your comfort level and pedaling style.
Installation and Set-up
Installing Pedals on Your Bike
Installing clipless pedals on your bike requires a few simple steps. First, you’ll need to remove the existing pedals, if any, from your bike. To remove the pedals, you’ll typically need a pedal wrench or an Allen key, depending on the type of pedals you have. Turn the wrench or Allen key counterclockwise to loosen and remove the pedals from the crank arms.
Once the old pedals are removed, inspect the threads on the crank arms to ensure they are clean and in good condition. If necessary, use a clean rag or a small brush to remove any dirt or debris that may hinder the installation process.
Next, take one of the clipless pedals and identify the side that should face outward when installed on the bike. Most pedals will have an “L” or an “R” indicator to denote the left and right pedals. Apply a small amount of grease or anti-seize compound to the threads of the pedal to facilitate installation and prevent seizing in the future.
Begin threading the pedal into the crank arm by hand, making sure it turns smoothly and easily. Once you’ve threaded it as far as you can by hand, use the pedal wrench or Allen key to tighten the pedal securely. Repeat the same steps for the other pedal, ensuring that you’re installing the correct pedal on the corresponding crank arm.
Remember to tighten both pedals firmly, but avoid over-tightening, as it may damage the threads or make future removal difficult. Once both pedals are installed, give them a final check to ensure they are securely attached and have no noticeable play or wobbling.
Adjusting Cleat Position
After installing the clipless pedals on your bike, it’s important to properly position the cleats on your cycling shoes. The cleat position significantly affects the engagement, comfort, and efficiency of the pedal system, so it’s worth taking the time to find the optimal position for your feet.
To adjust the cleat position, begin by wearing your cycling shoes and clipping into the pedals. Pedal for a few minutes to get a sense of how the cleats feel under your feet. Pay attention to any discomfort, hotspots, or uneven pressure points that may indicate the cleats need adjustment.
Most clipless pedal systems allow athletes to adjust the fore/aft position and the lateral position of the cleats. Fore/aft adjustment involves moving the cleats forward or backward along the sole of the shoe, while lateral adjustment refers to moving the cleats left or right.
To adjust the fore/aft position, locate the screws or bolts on the bottom of the shoe that secure the cleats. Loosen the screws slightly and slide the cleats forward or backward as desired, ensuring that they align with the ball of your foot. Once you have found the desired position, tighten the screws securely without overtightening.
Lateral adjustment is typically achieved by loosening the screws located on the side of the cleats and sliding them left or right. This adjustment allows you to center the cleats under the balls of your feet, ensuring even pressure distribution and optimal biomechanics.
When making adjustments to the cleat position, it’s advisable to make small changes and test the new position before finalizing the adjustments. Fine-tuning the cleat position may require some trial and error to find what feels best for you. If you’re unsure about cleat adjustment or want assistance, consider visiting a professional bike fitter who can help optimize your cycling position.
Fine-tuning Release Tension
Some clipless pedals provide an option to adjust the release tension, allowing riders to customize the force required to disengage the cleats. Fine-tuning the release tension can provide an added sense of control and help riders find the perfect balance between security and quick release.
Release tension adjustment is generally achieved through a small screw or dial located on the pedal itself. Consult the manufacturer’s instructions or the user manual that comes with your clipless pedals to identify the specific method for adjusting release tension.
To begin adjusting the release tension, make sure you’re in a secure and comfortable location, preferably off the bike. Most pedals allow adjustment with an ordinary screwdriver or a specific tool provided by the manufacturer.
Start by loosening the screw or dial that controls the release tension. This will decrease the force required to disengage the cleat. It’s advisable to make small adjustments, turning the screw or dial gradually, and testing the release tension after each adjustment. Repeat the process until you find a tension that suits your preference and allows for a quick and effortless release when needed.
Remember to keep notes or markings of the release tension adjustments you make, especially if you plan to switch between various shoes or cleats. This will help you replicate your preferred release tension settings across different setups and avoid any surprises during your rides.
Getting Started with Clipless Pedals
Practice Unclipping Safely
Getting started with clipless pedals can be an exciting and rewarding experience, but it’s crucial to practice unclipping safely before hitting the roads or trails. Familiarizing yourself with the release mechanism and developing muscle memory will significantly reduce the risk of accidents or falls.
Begin by finding an open and safe area to practice, such as a parking lot or an open field. Start with one foot already unclipped and positioned on the ground, while the other foot remains clipped into the pedal. Place your hands on a wall, fence, or any stable structure for support and balance.
Using your unclipped foot, push off the ground and pedal a few times with the clipped-in foot. Focus on maintaining a steady pedaling motion while keeping your body weight centered and balanced. This exercise will help you get used to the feeling of the pedal engagement and acquaint you with the foot movement required to unclip.
To unclip, start by twisting your heel outward, away from the bike frame. This motion will disengage the cleat from the pedal and allow your foot to release. Practice unclipping and clipping in repeatedly with both feet until you feel comfortable and confident in the process.
It’s important to note that releasing both feet at the same time can feel challenging for beginners, especially in emergency situations. To build confidence and ensure a quick and efficient release, practice unclipping one foot at a time, starting with your dominant foot. Gradually increase the difficulty by simulating emergency stops or sudden changes in direction while pedaling.
Remember that practice makes perfect, and it may take some time to build muscle memory and develop the skills required for quick and smooth unclipping. Don’t be discouraged if you encounter difficulties initially – with patience and practice, you’ll become proficient in unclipping safely and efficiently.
Start with Easy Terrain
When transitioning to clipless pedals, it’s advisable to start with easy terrain and gradually progress to more challenging routes. This approach allows riders to become familiar with the pedal system and adapt to the nuances of clipped-in riding without overwhelming themselves.
Begin by riding on flat, smooth surfaces, such as paved trails or quiet roads, where you can focus on pedaling technique, balance, and maneuverability. Familiarize yourself with the feeling of clipping in and out, and practice engaging and disengaging the cleats without looking down.
As you gain confidence and proficiency, gradually introduce gentle inclines and descents into your rides. Focus on maintaining a smooth and consistent pedaling cadence while adapting to changes in terrain. Pay attention to your body position, weight distribution, and pedal stroke, as these factors can significantly affect your control and efficiency with clipless pedals.
Once you feel comfortable on easy terrain, you can progress to more challenging routes, such as hilly terrain, technical trails, or group rides. Push your limits gradually and listen to your body – if you encounter difficulties, take a step back and practice on easier terrain before attempting more demanding rides.
Gradually Increase Difficulty
As you become more accustomed to clipless pedals, it’s important to gradually increase the difficulty level to further develop your skills and confidence. Gradual progression will allow you to push your limits while maintaining control and safety.
Start by incorporating short bursts of higher intensity efforts into your rides, such as faster sprints or hill repeats. These efforts will challenge your pedaling technique and force you to engage more muscle groups, helping to improve your power and endurance.
When venturing off-road or tackling technical trails, take it slow and choose routes that match your current skill level. Technical terrain presents additional challenges, such as navigating through rocks, roots, or drop-offs, which require precise control and balance. By starting with less technical trails and gradually progressing to more challenging ones, you’ll develop your handling skills and build confidence along the way.
Group rides can also provide an opportunity to test your skills with clipless pedals. Riding in a group setting allows you to learn from more experienced riders and observe their techniques. However, it’s important to communicate your skill level and clipless pedal experience to fellow riders, as this will help them understand your needs and provide support and encouragement when necessary.
Remember, learning to ride with clipless pedals is a process that takes time and practice. Don’t rush your progression or compare yourself to others. Every cyclist learns at their own pace, so be patient and enjoy the journey of mastering this exciting and rewarding pedal system.
Common Concerns and Tips
Fear of Falling
One of the most common concerns for riders transitioning to clipless pedals is the fear of falling. While it’s true that falls can occur, especially during the early stages of clipless pedal use, there are several ways to minimize the risk and build confidence.
Firstly, practicing unclipping safely, as discussed earlier, is crucial for reducing the chances of falling. By mastering the unclipping motion and developing muscle memory, you’ll be able to release your feet quickly and instinctively in emergency situations.
Additionally, it’s helpful to start with easy terrain, as discussed previously, to minimize the risk of accidents or falls. By beginning on flat and smooth surfaces, you’ll have more control and stability, allowing you to focus on mastering the pedal system without unnecessary distractions.
Another tip to alleviate the fear of falling is to gradually increase your cadence and pedaling efficiency. By maintaining a higher cadence, you’ll have a smoother pedal stroke, reducing the likelihood of sudden jerky movements that can lead to loss of balance.
Lastly, consider riding with a trusted cycling buddy or joining group rides where more experienced riders can provide support and guidance. Riding with others who are familiar with clipless pedals can offer valuable advice, encouragement, and assistance when needed, further boosting your confidence and easing any anxieties.
Unclipping Issues
Experiencing difficulties in unclipping from clipless pedals can be frustrating and potentially hazardous, but it’s a challenge that can be overcome with practice and proper adjustments. If you find that unclipping is consistently difficult or you’re constantly struggling to release your feet, consider the following tips:
- Release Tension Adjustment: Check the release tension setting on your clipless pedals. If it feels excessively tight, try loosening it gradually until you find a tension that allows for an easier release. Remember to test the release tension after each adjustment to find your preferred setting.
- Cleat Position: Double-check the position of your cleats on your cycling shoes. If the cleats are positioned too far forward or backward, it can affect the leverage required to unclip. Experiment with small fore/aft adjustments to find a position that facilitates easy and quick release.
- Lubrication: Apply a small amount of lubrication to the engagement mechanism of your clipless pedals. Over time, dirt and debris can accumulate in the mechanism, hindering the smooth engagement and disengagement of the cleats. Regular cleaning and lubrication can help maintain the functionality of your pedal system.
- Cleat Condition: Inspect the condition of your cleats regularly. Cleats can wear down over time, which may affect their engagement and release performance. Consider replacing your cleats if they show signs of excessive wear or damage.
- Relax and Practice: If you find yourself panicking or rushing when attempting to unclip, take a deep breath and relax. Remember that properly adjusted clipless pedals should allow for a quick and smooth release. Practice unclipping in a safe and controlled environment until it becomes second nature to you.
Remember, the difficulty of unclipping can vary between different pedal systems and individual riders. Finding the optimal combination of cleat position, release tension, and engagement mechanism takes time and experimentation. Don’t be discouraged if it feels challenging at first – with practice, you’ll become more proficient at unclipping and gain confidence in your abilities.
Maintenance and Care
Proper maintenance and care of your clipless pedals are essential for ensuring their longevity and optimal performance. Here are some key maintenance tips to keep in mind:
- Regular Cleaning: Clipless pedals can accumulate dirt, debris, or grime during rides, especially in off-road conditions. After each ride, take the time to remove any dirt or debris from your pedals using a brush or a cloth. This preventive measure helps prevent any particles from interfering with the pedal engagement or cleat performance.
- Lubrication: Apply a small amount of lubrication to the pedal engagement mechanism periodically. This will ensure smooth engagement and disengagement of the cleats. Consult the manufacturer’s instructions or recommendations for the specific lubrication requirements of your pedal system.
- Cleat Inspection: Regularly inspect your cleats for signs of wear or damage. Pay attention to the engagement points and ensure that they are not excessively worn or rounded. If you notice any issues with your cleats, such as loose screws or signs of wear, consider replacing them to maintain optimal performance and safety.
- Cleat Bolt Tightness: Check the tightness of the cleat bolts periodically, as vibrations during rides can cause them to loosen over time. Use an appropriate tool to ensure the cleat bolts are securely fastened but be careful not to overtighten and risk damaging the cleats or shoe soles.
- Pedal Body Maintenance: Inspect the pedal body for any signs of damage, wear, or loose screws. If you notice any issues, consult the manufacturer’s recommendations for maintenance or consider having your pedals serviced by a professional bike shop.
- Replace as Needed: Clipless pedals, like any other bicycle component, have a lifespan. If you notice significant wear, loss of performance, or damage that cannot be repaired, it may be time to replace your clipless pedals. Investing in a new set of pedals will ensure optimal performance and safety during your rides.
By incorporating regular maintenance and care into your cycling routine, you can extend the lifespan of your clipless pedals and enjoy their benefits for many miles to come.
Clipless Pedals vs. Platform Pedals
Advantages of Clipless Pedals
Clipless pedals offer several advantages compared to traditional platform pedals. Here are some key benefits of clipless pedals:
- Enhanced Efficiency: Clipless pedals allow for a more efficient transfer of power from the rider’s legs to the pedals. With the feet securely attached to the pedals, power can be applied evenly throughout the pedal stroke, resulting in improved pedaling efficiency and speed.
- Increased Control and Stability: The secure connection between the feet and clipless pedals provides enhanced control and stability, particularly during technical sections or high-speed descents. This increased control allows riders to maneuver the bike with precision and confidence.
- Reduced Foot Slippage: Clipless pedals virtually eliminate the risk of foot slippage, which can occur with platform pedals, especially during intense efforts or wet conditions. The secure engagement between the cleats and pedals ensures that the feet remain in place, minimizing power loss and maximizing efficiency.
- Efficient Power Transfer: Clipless pedals maximize power transfer by engaging not only the downward push but also the upward pull of the pedal stroke. This full-circle pedaling motion engages additional muscle groups, resulting in increased power output and reduced fatigue.
Advantages of Platform Pedals
While clipless pedals offer numerous benefits, platform pedals still have their place in specific cycling disciplines or situations. Here are some advantages of platform pedals:
- Ease of Use: Platform pedals are incredibly user-friendly since they don’t require any special shoes or cleats. Riders can simply hop on their bikes with any type of footwear and start pedaling. This accessibility can be particularly appealing for casual riders, commuters, or those who frequently switch between cycling and walking.
- Beginner-Friendly: Platform pedals are often recommended for beginner cyclists or those new to clipless pedals. They provide a sense of security, as riders can quickly and easily place their feet on the ground when needed. This ease of unclipping can help build confidence and reduce the fear of falling, especially during the early stages of learning to ride a bike.
- Freestyle and BMX Riding: Platform pedals are the preferred choice for freestyle and BMX riders who rely on quick foot placement and the ability to easily remove their feet from the pedals mid-air. In these disciplines, riders often execute tricks or stunts that require fast and frequent foot adjustments, which can be challenging or unsafe with clipless pedals.
Choosing the Right Pedals for You
When deciding between clipless pedals and platform pedals, it’s important to consider your cycling goals, preferences, and riding style. Here are a few factors to help you make an informed decision:
- Cycling Discipline: Consider the specific discipline you mainly engage in – road cycling, mountain biking, commuting, touring, or other cycling disciplines. Different pedal systems cater to the unique demands and conditions of each discipline, so choosing the most suitable option will enhance your enjoyment and performance.
- Skill Level: Beginners or those new to clipless pedals may find platform pedals to be more user-friendly and less intimidating. Platform pedals allow riders to focus on developing basic cycling skills without worrying about unclipping or compromising safety.
- Riding Style and Terrain: Consider the type of terrain you most often encounter during your rides. If you frequently encounter technical trails, off-road conditions, or engage in freestyle cycling, platform pedals may offer the flexibility and freedom you need. However, if you prioritize efficiency, power transfer, or long-distance riding, clipless pedals may be the better choice.
- Personal Preference: Ultimately, personal preference plays a significant role in the decision-making process. Some riders may thoroughly enjoy the efficiency and control of clipless pedals, while others may prefer the simplicity and versatility of platform pedals. Experimenting with both types of pedals and seeking advice from experienced riders can help you determine which system suits you best.
Remember, there’s no right or wrong answer when it comes to choosing between clipless pedals and platform pedals. The decision should be based on your individual needs, goals, and comfort level. Cycling is about enjoyment and personal growth, so choose the pedal system that will enhance your riding experience and help you achieve your cycling aspirations.
Notable Clipless Pedal Brands
Several reputable brands specialize in producing high-quality clipless pedals. While there are many options available on the market, here are a few notable brands recognized for their pedal innovation, performance, and durability:
Shimano
Shimano is a leading manufacturer in the cycling industry, known for its wide range of reliable and high-performance components. Shimano clipless pedals are favored by professional cyclists and recreational riders alike. Their pedal line includes various models suitable for road cycling, mountain biking, cyclocross, and hybrid riding. Shimano pedals are known for their robust design, smooth engagement, and adjustable features.
Look
Look is another renowned brand in the cycling world, specializing in clipless pedal systems. Look pedals are often associated with road cycling, where they have become a staple among professional riders. Look pedals feature a distinctive design and have gained a reputation for their lightweight construction, aerodynamic features, and excellent power transfer. With multiple models available, Look offers a range of options to cater to different pedaling styles and preferences.
Speedplay
Speedplay is a brand recognized for its innovative approach to clipless pedal systems. Speedplay pedals stand out with their unique engagement design, which allows for dual-sided entry, exceptional cornering clearance, and a low stack height. Speedplay pedals offer high adjustability, customizable float, and lightweight construction. They have gained popularity among road cyclists, time trialists, and triathletes for their performance-oriented design and unique features.
These are just a few notable brands in the clipless pedal market, but there are many other options available to suit various preferences and budgets. When choosing clipless pedals, it’s important to consider factors such as engagement mechanism, cleat compatibility, weight, durability, and adjustability. Researching different brands and models, reading customer reviews, and seeking advice from knowledgeable cycling enthusiasts can help you make an informed decision and find the perfect clipless pedals for your cycling needs.
Conclusion
Clipless pedals have redefined the cycling experience for riders of all disciplines. Offering enhanced pedaling efficiency, control, stability, and reduced foot slippage, clipless pedals have become a game-changer in the cycling industry. By properly understanding how clipless pedals work, the benefits they offer, tips for choosing the right pedal system, installation and set-up instructions, getting started advice, and maintenance guidelines, you can fully embrace the advantages of clipless pedals and maximize your cycling performance.
As with any new skill or cycling equipment, transitioning to clipless pedals requires patience, practice, and persistence. The initial learning curve may present some challenges, but with time and experience, you’ll become proficient in using clipless pedals and wonder how you ever rode without them.
Remember to start slowly, gain confidence gradually, and prioritize safety in your cycling journey. Seek support from experienced riders, consult professionals for advice, and don’t hesitate to keep learning and improving your skills. By embracing the world of clipless pedals, you’ll unlock a new level of cycling performance, enjoyment, and personal growth. So, clip in, take the leap, and enjoy the ride!